Raspberry Pi SSH & Putty: Beginner's Guide Connect Now!
Is the world of Raspberry Pi a realm you're eager to explore, yet finding yourself tangled in the intricacies of remote access? Connecting to your Raspberry Pi from your Windows machine using PuTTY, a popular SSH client, is not just a convenience, but a foundational skill for any aspiring maker, hobbyist, or professional delving into the world of single-board computers.
The journey begins with grasping the fundamentals. You've likely already taken the initial steps: downloading and installing the latest Raspbian OS, perhaps using a tool like Etcher to flash the image onto an SD card. You've probably also, at some point, considered the often-overlooked step of creating an empty "ssh" file (without any file extension) in the boot partition of your SD card. This is a classic method to enable SSH access by default on a headless Raspberry Pi setup. While this approach is still relevant, understanding alternative methods and troubleshooting common pitfalls is key to mastering this technology.
Let's consider a hypothetical individual navigating this very landscape. Imagine a software developer named Alex, who is enthusiastic about home automation and wants to control their smart home devices through a Raspberry Pi. Alex needs remote access for management, debugging, and deployment. Consider the following table illustrating Alex's background and needs:
- Xmen Movie Franchise Timeline Cast Future Explained
- Anne Burrell Stuart Claxton Married Wedding Photos Love Story Revealed
| Category | Details |
|---|---|
| Name | Alex Johnson |
| Occupation | Software Developer |
| Expertise | Python, Networking, Embedded Systems |
| Raspberry Pi Usage | Home Automation, Remote Server Management |
| Challenge | Establishing a reliable and secure remote connection via SSH. |
| Environment | Windows 10, Raspberry Pi 4B, Local Network |
| Goal | Access Raspberry Pi terminal remotely using PuTTY. |
| Actions Taken | Installed Raspbian OS, enabled SSH, configured PuTTY. |
| Problem Encountered | Inability to establish a consistent SSH connection despite correct IP address and credentials. |
| Troubleshooting Steps | Checked IP address with `ifconfig` command, verified SSH service status. |
| Resources Used | Online Forums, Official Raspberry Pi Documentation, PuTTY Documentation. |
| Solutions | Fixed IP assigned to the Raspberry Pi, disabled firewall, purged known host keys if any. |
| Results | Successful SSH connection, enabling remote control and management. |
| Reference | Raspberry Pi Documentation |
A core principle to remember is that your client, in this case, PuTTY on your Windows machine, stores SSH keys from previous sessions. If you've connected to the same Raspberry Pi (or even a Raspberry Pi with a fresh OS install but the same IP address) before, the keys on both sides might not match. This is a common stumbling block. One of the first troubleshooting steps involves deleting the stored keys from your client. PuTTY stores these in the Windows Registry.
A crucial preliminary step before even launching PuTTY is confirming network connectivity. Are you able to ping your Raspberry Pi from your Windows machine? Open a command prompt and enter `ping [your_raspberry_pi_ip_address]`. If you receive replies, your network connection is good. If not, you have a networking problem preventing SSH from working. In Alex's case, initial tests showed no connection. This meant the problem was not with PuTTY, but with the local network or the Raspberry Pi's IP address. A common cause of connectivity issues is a dynamic IP address that might have changed since the last time the Pi was accessed.
Once the networking is confirmed, it's time to delve into the specifics of PuTTY. Alex faced the all-too-common scenario of opening PuTTY, entering the Raspberry Pi's IP address in the "Host Name (or IP address)" field, clicking "Open," and receiving the dreaded "Putty (inactive)" message. This typically indicates either a problem with the IP address, SSH not being enabled on the Pi, or a firewall blocking the connection. For Alex, the initial IP address was incorrect, and changing it resolved the primary problem.
For those using domain names or hostnames instead of IP addresses, it's essential to have your network correctly configured. Assigning a fixed IP address to your Raspberry Pi through the `cmdline.txt` file is a good practice. Alex was able to successfully ping their Raspberry Pi, indicating that basic network connectivity was working, but still couldn't establish an SSH connection.
Let's assume you've progressed past the basic connection issue. What if you can connect with PuTTY and also using a VNC viewer? When using a graphical environment (GUI) like Xming to forward the desktop, you might encounter slow loading times. Launching applications, like the Scratch programming environment, takes a while to draw. This can sometimes be related to the resources available, particularly memory, and also related to the network connection speed if it is a remote graphical session.
The system may even abruptly halt, displaying a message: "The system is going down for system halt now!" This likely indicates a problem with the system's operation, not just an issue with SSH access, and can be caused by power supply issues, memory corruption, or a software bug. Such issues demand closer inspection of the system logs and hardware components.
For accessing the Raspberry Pis GUI remotely, beyond just the command line (which is what SSH gives you), you should consider using a VNC viewer app on your phone or desktop. After logging into the Raspberry Pi through PuTTY, you can initiate the graphical desktop by typing `startx`. This command loads the desktop interface. This approach allows you to view and interact with the Raspberry Pi's graphical environment remotely, providing full control.
To manage your Raspberry Pi more efficiently, explore tools like `tmux`. The method for installing it depends on your operating system, but the command `sudo apt install tmux` is a common starting point. Once tmux is running, you can start your Python scripts or any other long-running processes within it. This lets you disconnect from your SSH session without interrupting the processes youre running on your Raspberry Pi. Alex's project included a long-running Python script for home automation, so tmux was a logical choice for them.
The basics are simple: Login to your Pi through PuTTY (or a keyboard/monitor setup if you have one). Then, at the command prompt on the Raspberry Pi, type `ifconfig`. The output of this command is crucial: the `eth0` section (or `wlan0` for Wi-Fi) will display the "inet addr" your Raspberry Pi's IP address. This is the address you'll need to enter in the PuTTY "Host Name (or IP address)" field.
PuTTY is a vital tool for connecting to serial ports and SSH on Raspberry Pis. While primarily used on Windows, it can also run on a Raspberry Pi itself (though this is less common). Using PuTTY, you learn how to access your Raspberry Pi terminal remotely from your Windows computer. This remote access provides the convenience and control you need, whether you're tinkering with a single project or managing an entire network.
To use SSH keys with PuTTY, the process differs slightly. You can follow the steps on how to create and utilize SSH keys to improve the security. SSH keys ensure that the connection is made securely. If you're dealing with a headless setup, and have SSH disabled by default on a fresh install, you will need to enable it. For Raspberry Pi OS desktop, this is easily done in the "Interfaces" tab of the Raspberry Pi Configuration tool. For Raspberry Pi OS Lite, this is part of the advanced options available when flashing the SD card.
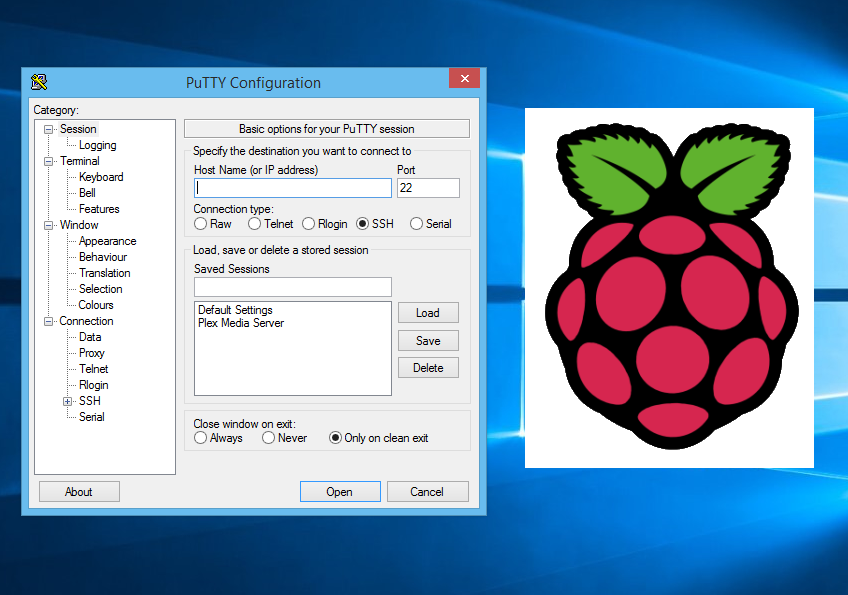
In PuTTY, you can create profiles to save settings for different SSH servers, eliminating the need to repeatedly type in the settings. For example, to create a profile for the server at 192.168.0.100, you would enter the IP address, save the session, and give it a name. Whenever you want to connect to that server, you simply load the profile.
Here is a concise breakdown of the process, focusing on the essential aspects:
- Download and Install Raspbian: The first step is the essential one. Download the latest Raspbian OS from the official Raspberry Pi website and install it on your SD card using a tool like Etcher.
- Enable SSH: On a Raspberry Pi OS desktop, enable SSH through the Raspberry Pi configuration tool under the interfaces tab. On Raspberry Pi OS Lite, you can do so in the advanced options when flashing the SD card. Alternatively, create an empty file named "ssh" (no extension) in the boot partition of the SD card before booting the Pi for the first time.
- Find Your Raspberry Pi's IP Address: After booting the Raspberry Pi, you'll need to know its IP address. You can find this using `ifconfig` in the terminal (after logging in locally or via serial), or by checking your router's connected device list.
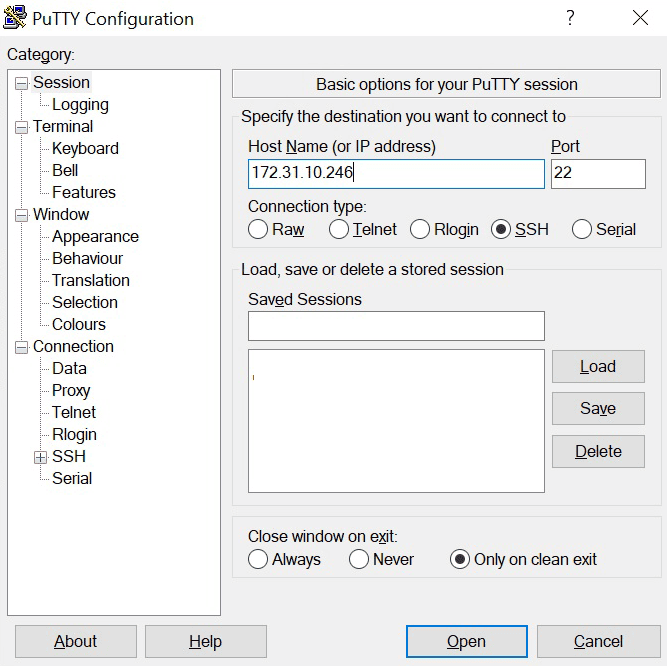
- Configure PuTTY: Open PuTTY on your Windows machine. Enter the IP address of your Raspberry Pi in the "Host Name (or IP address)" field. Select "SSH" as the connection type.
- Connect and Authenticate: Click "Open." You'll be prompted to accept the host key (if this is your first time connecting). Then, enter your username and password for your Raspberry Pi user account (by default, the username is usually "pi" and the password is "raspberry", until you change it).
- Start Using SSH: You are now connected to your Raspberry Pi via SSH! You can now enter commands to control the Pi from your Windows machine.
If you encounter a "Putty (inactive)" error, here's a checklist:
- Double-check the IP address.
- Ensure SSH is enabled on the Raspberry Pi.
- Check your network connection (can you ping the Pi?).
- Disable any firewalls that might be blocking the connection.
- Make sure the Raspberry Pi is powered on and has a stable internet connection (if needed for software updates).
- If you have previously connected, consider clearing your PuTTY cache for that IP.
The goal is to move past basic connectivity and into a state where you can manage your Pi with efficiency. In Alexs home automation project, a reliable SSH connection was critical. The ability to connect via PuTTY, run commands remotely, and even manage a graphical desktop (with applications like VNC) all contributed to a robust and functional system.
To be successful with SSH, you might need to troubleshoot. One common scenario is that your client may store SSH keys of previous sessions. If you have SSHd in the past with the same client to another device on the same IP, the keys on both sides do not match. To resolve this, delete the keys on your client. PuTTY stores these keys in the registry.
You can configure PuTTY for serial or network connection and send commands to the Pi. Remember, to connect via PuTTY, you'll need your Raspberry Pi's IP address. Use `ifconfig` in the terminal on your Raspberry Pi to find the IP address. Ensure that both the Raspberry Pi and your Windows machine are on the same network, with SSH enabled on the Raspberry Pi.
Let's say that you've set up your Raspberry Pi, you probably don't want to use your keyboard and mouse. A remote connection helps. You can remotely access your Raspberry Pi via SSH from any other computer in the same network as your Pi. This is especially useful after setting up your Raspberry Pi and you want to access it without direct physical access. A remote connection also allows you to control your Pi through the command line, even in unsecured networks, which can be extremely helpful in many projects.
Always ensure that your Raspberry Pi is set up correctly, and SSH is activated. After you've installed the Raspbian operating system, the next step is to get the IP address of your Raspberry Pi. This address is the key to connecting. Remember to enter the IP address in the appropriate field in PuTTY, select SSH as the connection type, and then click "Open". You will then be prompted for your username and password. By default, the username is 'pi' and the password is 'raspberry', but you should always change the password for security reasons after the first login.
So whether you're a beginner just starting out or an experienced user looking to refine your workflow, mastering PuTTY with Raspberry Pi is a valuable skill. With a little patience and attention to detail, you can unlock the full potential of your Raspberry Pi projects from the comfort of your own computer.

Detail Author:
- Name : Prof. Ambrose Kulas I
- Username : xschuster
- Email : white.saul@hill.com
- Birthdate : 2002-05-09
- Address : 62225 Reilly Place West Jack, WY 34816
- Phone : 801.417.5152
- Company : Mayer-Lebsack
- Job : Orthotist OR Prosthetist
- Bio : Aut saepe ratione voluptatibus non. Ut ipsa voluptatem pariatur sit. Quasi tenetur dicta officia reiciendis quaerat doloremque. Voluptatem et labore animi a natus. Tempore molestiae illum nihil.
Socials
linkedin:
- url : https://linkedin.com/in/barbara2920
- username : barbara2920
- bio : Ducimus et corporis aut.
- followers : 6949
- following : 608
instagram:
- url : https://instagram.com/bhoppe
- username : bhoppe
- bio : Tenetur alias atque id quis rerum. Commodi vero est temporibus dicta aut temporibus.
- followers : 6525
- following : 2502
